Building an extraction laboratory is one of the biggest investments you will make in the cannabis or hemp industry. Get it right, and you have a production pipeline that generates consistent, high-quality products for years. Get it wrong, and you are looking at wasted capital, compliance headaches, and products that never meet market standards.
This guide breaks down the entire process of building an extraction lab from the ground up. We cover everything from initial business planning and equipment selection to safety infrastructure and biomass sourcing, giving you a clear roadmap whether you are launching your first lab or scaling an existing operation.
Four Questions You Must Answer Before You Buy a Single Piece of Equipment
Before you even think about sourcing equipment, you need a cohesive business plan built around four foundational questions. Skipping this step is the fastest way to waste money on gear that does not match your production goals.
1. What Products Are You Making?
Your end product dictates everything: the type of extraction equipment you need, your post-processing pipeline, and even your facility layout. Are you producing dabbables like shatter, wax, and crumble? Vapable products for cartridges? Edible-grade distillate? Topical formulations? Each product category requires different equipment configurations and post-processing steps.
2. What Are Your Throughput Requirements?
How much product do you need to manufacture to hit your revenue targets? Understanding your minimum throughput from day one prevents you from over-investing in equipment you will not fully utilize, or worse, under-investing and creating bottlenecks that kill your margins.
3. What Is Your Budget?
The best approach is to invest in quality equipment that is clean, safe, legal, and effective. As the saying goes: buy once, cry once. Cutting corners on critical equipment to save a few thousand dollars up front almost always costs more in downtime, failed batches, and replacement parts down the road.
4. Who Is Going to Train Your Team?
Do not rely solely on equipment manufacturers for training. While they may be competent engineers, they are not always organic chemists with hands-on production experience. There are nuances in extraction and post-processing that only come from specialized knowledge. Hiring an independent consultant to audit your processes and train your team is one of the highest-ROI investments you can make.
The Four Product Categories in Cannabis Extraction
Nearly every product that comes out of an extraction laboratory falls into one of four target areas:
- Dabbables: Shatter, wax, crumble, budder, diamonds
- Vapables: Vape cartridges, disposable pens
- Edibles: Distillate and isolate for infused products
- Topicals: Creams, salves, and transdermal applications
For this guide, we focus on a lab designed to produce both dabbables and vapable products, as these target the recreational market where the majority of revenue sits. We assume approximately 750 square feet of dedicated lab space, full legal compliance, access to biomass, and a budget focused on quality over cutting corners.
Regardless of your product focus, we strongly recommend operating to cGMP (current Good Manufacturing Practice) standards from the start. Federal regulation is coming, and labs that already meet pharmaceutical-grade standards will not need expensive retrofits when the FDA steps in.
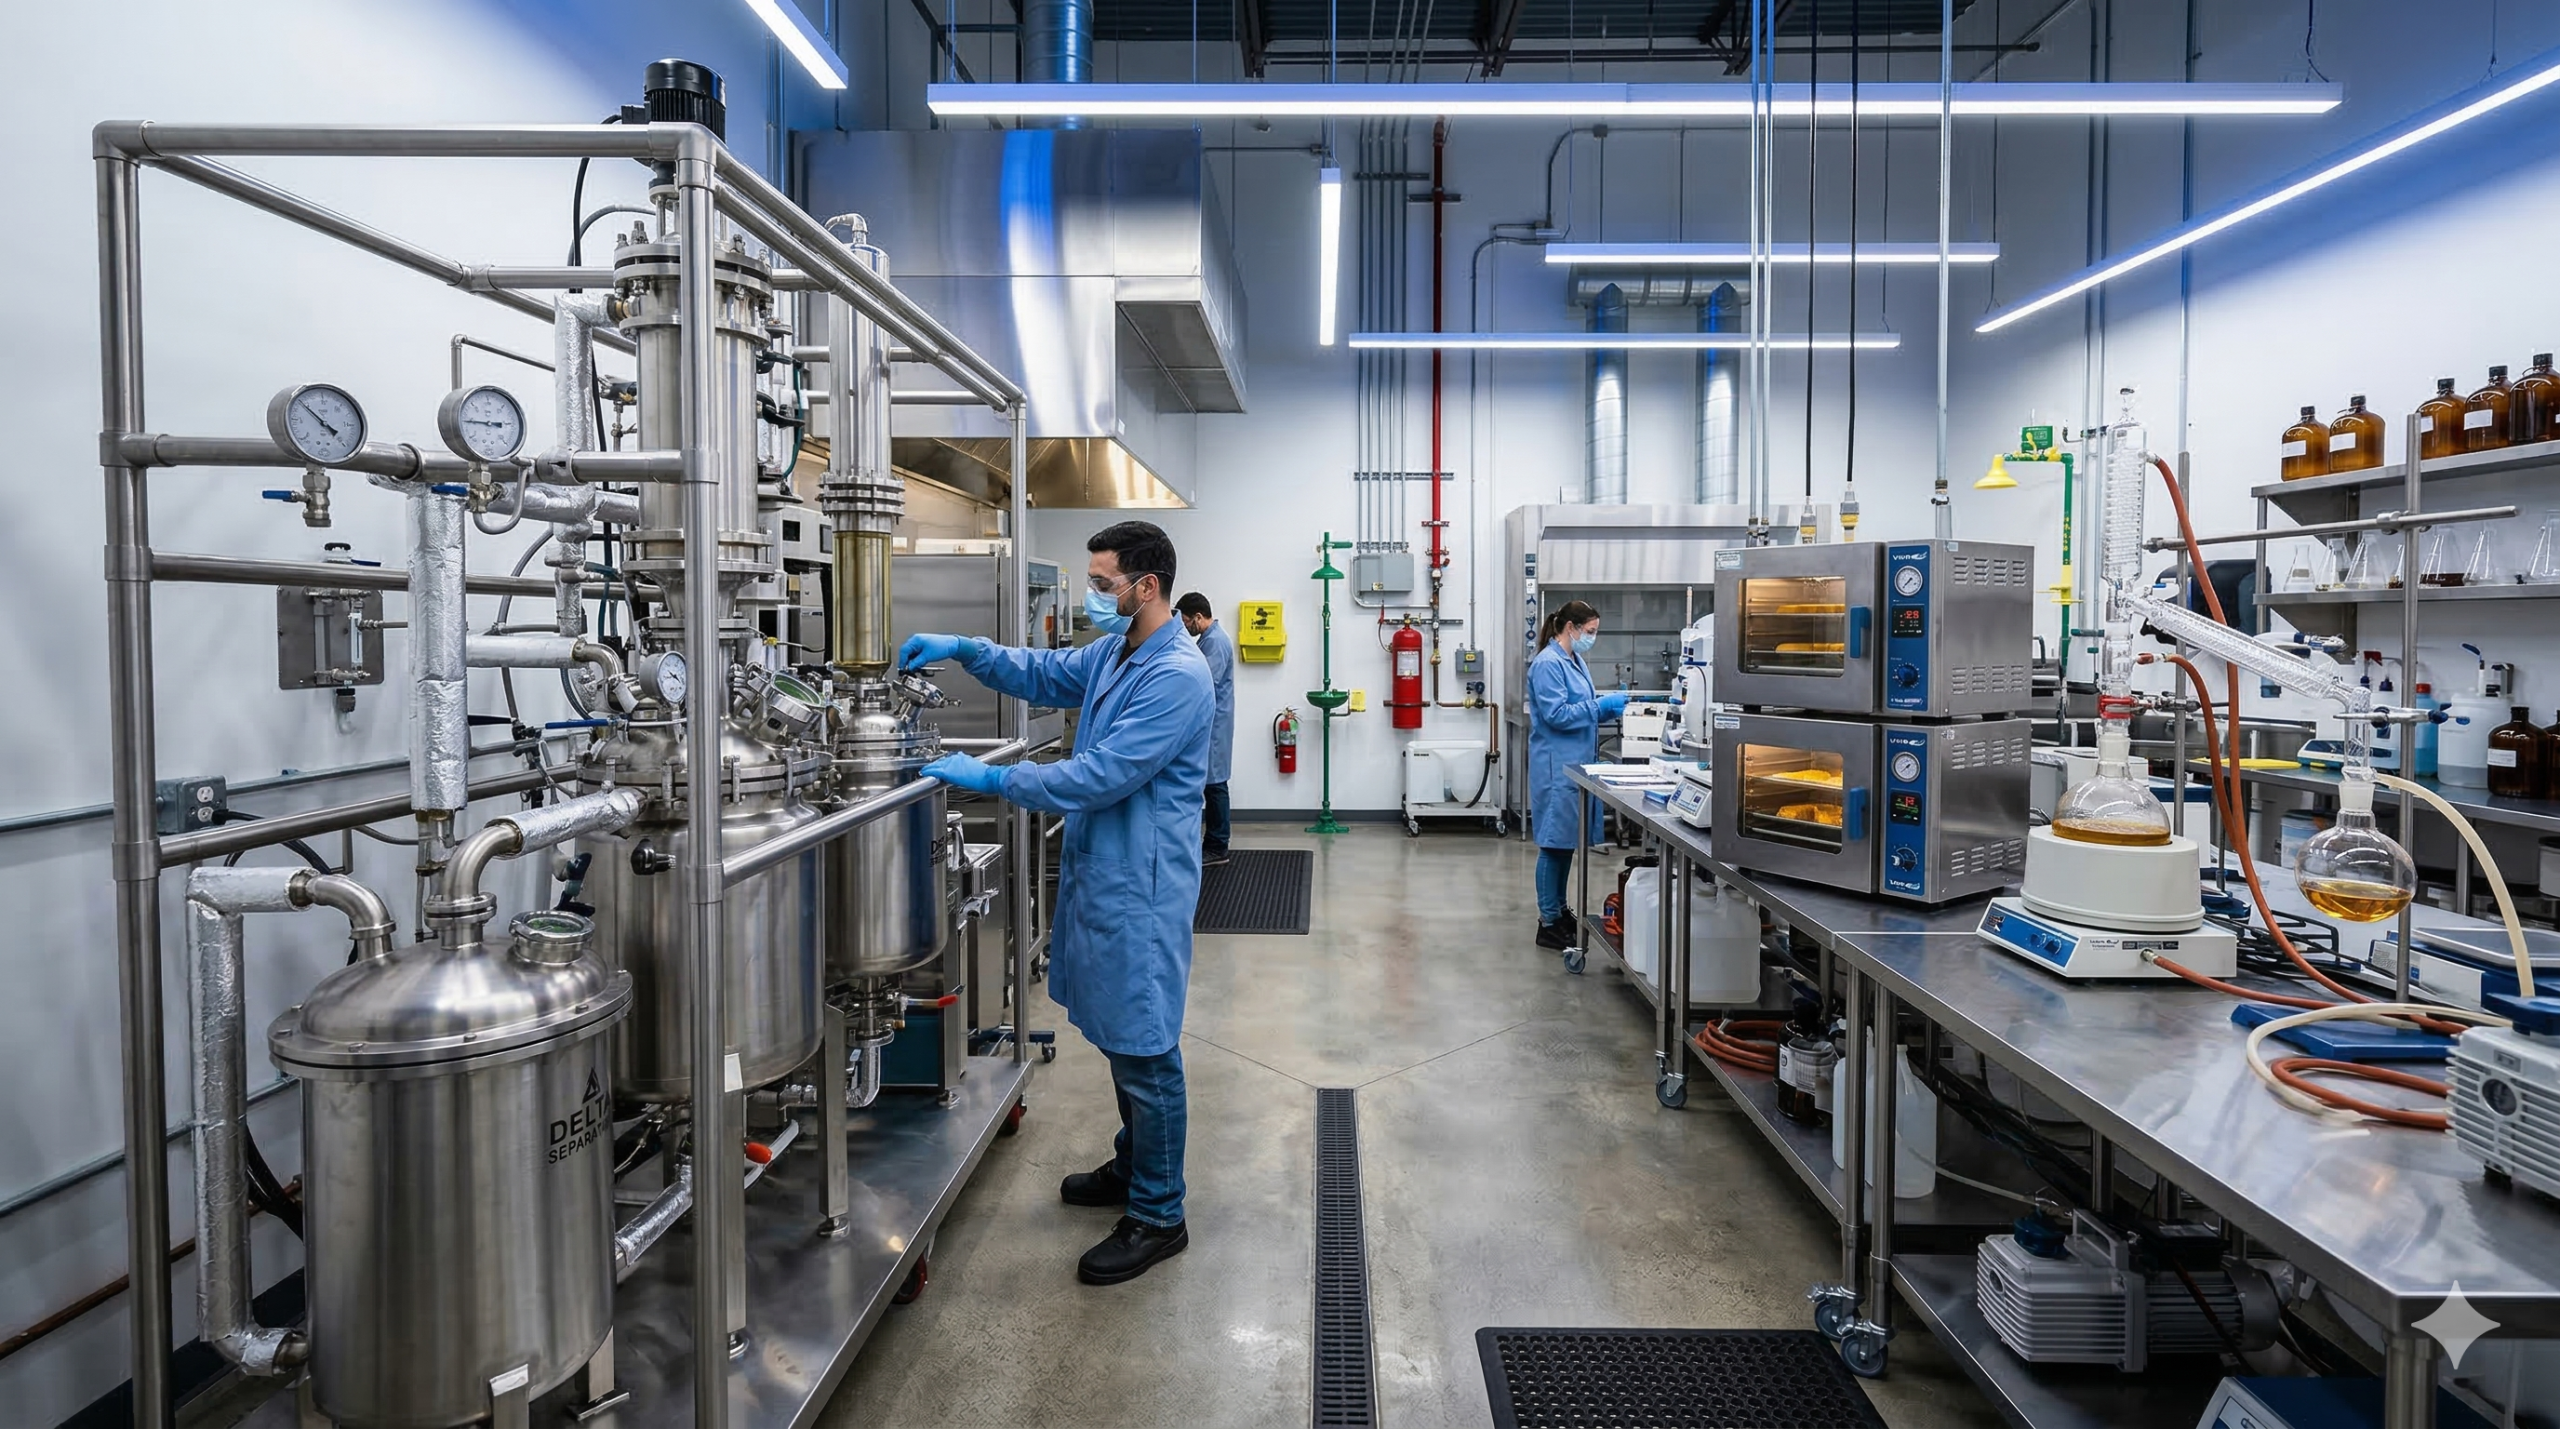
The Seven Target Areas of Your Extraction Lab
Once your business plan is locked in, your lab needs to address seven distinct production areas. Each one plays a critical role in the quality and consistency of your final product.
1. Extraction: Why LPG Closed Loop Systems Win
For producing dabbables and vapables, there is no replacement for an LPG closed loop extraction system. These systems use butane, propane, or blends of both to selectively extract cannabinoids while leaving behind most plant material impurities.
We prefer customizable closed loop systems over highly automated units with all the bells and whistles. Through years of experience, the ability to manipulate and customize your extraction equipment to fit your specific needs and throughput goes a long way toward increasing product quality, color, clarity, and purity.
Why not CO2 extraction? Three reasons:
- Speed: CO2 systems are extremely slow compared to LPG at equivalent throughput
- Cost: The same throughput that costs $20,000 to $30,000 in a closed loop system will run $750,000 to $1 million in CO2 infrastructure
- Selectivity: CO2 pulls significantly more fats, lipids, and waxes from the plant material, forcing you to invest heavily in winterization and filtration to clean up the extract
When properly trained on safe operating procedures, the risk profile of LPG systems is comparable to CO2. The small footprint of closed loop systems also means more of your 750 square feet can be dedicated to post-processing.
2. Oven Production: The Details That Matter
Vacuum ovens range from $1,000 to $25,000 for the same cubic footage, and while they technically do the same job, two critical details separate the cheap ones from the reliable ones:
- Vacuum seal quality: The Viton gasket around the door must be properly seated. A poor seal means you cannot maintain consistent vacuum levels, and your parameters drift throughout the purge cycle.
- Heat distribution and retention: When you open the oven to flip shatter slabs, a cheap oven might drop 10 degrees instantly. The heating filaments then overcompensate, cooking your product and destroying the stability that makes shatter actually shatter.
Saving $3,000 on a cheaper oven is not worth it when inconsistent temperature control ruins batch after batch. Invest in ovens with individually heated shelves and proper thermal retention.
3. Winterization: The Step You Cannot Skip
Winterization removes fats, lipids, and waxes from your crude extract. For dabbable products made with cold LPG, the fat content is often negligible. But for vapable products heading to distillation, winterization is non-negotiable. Without it, you are looking at clogged pumps, contaminated fractions, and first-pass distillate testing only 65% to 70% total active cannabinoids instead of the 90%+ target.
Common misconception debunked: Many operators believe that running cold enough solvent eliminates the need for winterization. While colder solvents do pick up fewer fats, there is a trade-off: solvent saturation decreases with temperature. Below about -30°C, your solvent picks up so few cannabinoids that yields drop to 6% to 8%. The optimal temperature is around -30°C, which still requires subsequent winterization for distillate production.
Three winterization methods, scaled to your operation:
- Cryo fridge / mason jar method: 3:1 solvent-to-oil ratio, freeze, filter every 24 hours. Cost: under $1,500. Works well up to medium scale.
- Lenticular filter systems: For larger operations with multiple extraction and distillation units. 316 stainless steel, cGMP compliant. Cost: $2,500 to $3,000 upfront plus ~$800 per filter replacement every 30 to 90 days.
- Nano membrane filtration: Adapted from the desalination industry. Highest upfront cost (~$125,000) but lowest ongoing maintenance and energy consumption.
4. Decarboxylation: Do It Before Distillation
Here is another misconception that costs operators time and money: many believe they can skip dedicated decarboxylation because the oil passes through decarb temperature (140°C) on its way to distillation temperature (205°C). Technically true, but the consequences are severe. Without proper decarboxylation before distillation, your short path runs stretch to 10, 12, even 14 hours. You get oversized heads fractions contaminated with residual solvents, and your main body fraction suffers.
Standard decarb parameters: 140°C for 45 minutes at the internal oil temperature, not the external heating unit display. Always verify with an infrared thermometer because external readings can be 10 to 20 degrees off from the actual oil temperature.
Safety note: If residual solvents remain in your oil, it will not reach decarb temperature until those solvents boil off. This creates a volatile bubbling effect. Fill your decarb vessel only two-thirds full to prevent boil-overs, and always ensure adequate solvent recovery before starting decarb.
5. Distillation: Short Path vs. Wiped Film
Your choice between short path distillation (SPD) and wiped film evaporation (WFE) comes down to scale and throughput.
Short path distillation is ideal for smaller operations. We recommend the G33 with a packable head because you can add filtration media directly inside the distillation head. One important myth to bust: a larger distillation head does not necessarily increase throughput. A smaller packable head can match the output of heads costing $17,000 or more.
In short path distillation, you are managing three fractions:
- Heads: Volatiles and terpenes. Discard these. Distillation-recovered terpenes smell like dead fish and will ruin your vape product.
- Main body: Your target fraction at 90%+ total active cannabinoids
- Tails: Thick residue with remaining cannabinoids. Can be re-run later.
The most critical measurement is vapor temperature, not mantle temperature. A short path without a vapor thermocouple is incomplete. Vapor temperature tells you exactly which fraction you are collecting and which cannabinoids are boiling off.
Wiped film distillation is the better choice at scale. Key requirements: three temperature control zones (hopper, molecular head, cold trap) and two pumps (rotary vane plus roughing pump, versus just rotary vane for SPD). Get the deepest vacuum possible rather than trying to regulate to a specific level.
One more myth busted: You cannot separate CBD from Delta-9 THC using distillation. Their boiling points are so close, especially under vacuum, that they always co-distill. Any equipment manufacturer claiming otherwise is either misinformed or not telling the truth.
6. Filling Station and Terpenes
For vape cartridge production, the most important feature of your filling machine is that every component is heated: the hopper, all hoses, and the needle itself. Distillate flows freely when warm but clogs instantly when cold, and clearing a clogged needle mid-production is a painful time sink.
For terpenes, always use natural rather than synthetic sources. Synthetic terpenes cause the harsh throat hit and coughing that consumers complain about. We recommend a maximum of 5% terpene content by weight. Most flavor and aroma profiles come from combinations of seven primary terpenes (each with alpha and beta variants), so a skilled formulator can create virtually any flavor profile from natural sources.
7. Safety: 10 Non-Negotiable Requirements
If your lab does not have these 10 safety components, it is not ready to operate. Period. No amount of production capability justifies putting yourself or your employees at risk.
- Ventilation: Maintain negative pressure at all times. Emergency ventilation must handle 30 air changes per hour to evacuate flammable gases.
- Fire suppression: Gas-based suppression systems (not water) to prevent pressurized containers from exploding when exposed to flame.
- Static discharge mats: Grounded to a grounding rod. Stand for 30 seconds before entering the lab. Wear non-static clothing like medical scrubs.
- Class 1 Division 1 electrical: All electrical components intrinsically contained to prevent arcing in the presence of flammable vapors.
- Gloves: Three types on hand at all times: heat-resistant, cold-resistant (for dry ice and cryo equipment), and nitrile for contamination control.
- Lab coats: Allow quick removal in case of chemical spills, acid contact, or catalyst exposure.
- Eye protection: Standard lab safety glasses and splash-rated goggles.
- LEL gas detection: Lower explosive limit meters integrated with your ventilation system to automatically trigger emergency exhaust and alarms.
- Alarm system: Audible alarms linked to gas detection and ventilation, loud enough to be heard over lab equipment.
- Cameras: Monitor all lab areas. Never leave a person working alone in the lab. Cameras also help identify employee safety compliance issues before they become incidents.
C1D1 Compliance: What It Actually Takes to Build a Legal Extraction Lab
The safety checklist above tells you what your lab needs. This section tells you why the authorities care, what the classifications mean, and where most operators get blindsided by compliance costs they never budgeted for.
Every cannabis extraction lab that uses flammable solvents, and that includes butane, propane, ethanol, and pentane, falls under the National Electrical Code (NFPA 70) hazardous location classification system. The classification determines every design decision from your light fixtures to your thermostat. Misunderstand the classification and your lab fails its first AHJ inspection, burns through your build budget on retrofits, or never opens at all.
Class 1 Division 1 vs. Class 1 Division 2: What Triggers Each Classification
Class 1 Division 1 (C1D1) applies to any area where ignitable concentrations of flammable gases or vapors exist under normal operating conditions. If your extraction process releases butane, propane, or ethanol vapor during routine operations, that room is C1D1. Period. This includes:
- The extraction booth where you run your closed loop system
- Any room where you open the collection pot to recover crude extract
- Solvent storage areas where tanks are connected to delivery lines
- Any space where a single equipment failure (valve leak, fitting failure) would release flammable vapor
Class 1 Division 2 (C1D2) applies to areas where flammable concentrations only exist during abnormal conditions: equipment malfunction, accidental rupture, or ventilation failure. Rooms adjacent to your C1D1 extraction booth often qualify as C1D2 if they share ventilation pathways.
The practical difference: C1D1 requires explosion-proof everything. C1D2 allows some standard industrial equipment if it cannot produce arcs or sparks during normal operation. The cost difference between the two can be ,000 to ,000 for the same room, so getting the boundary lines right matters.
HVAC and Ventilation: The System That Keeps Everyone Alive
Your HVAC system is not an afterthought. It is the primary safety mechanism that prevents your C1D1 room from becoming a bomb. Three parameters matter:
Air changes per hour (ACH): Standard operation requires a minimum of 12 ACH with negative pressure relative to adjacent spaces. Emergency exhaust mode, triggered automatically by your LEL gas detection system, must deliver 30 ACH or higher. Some jurisdictions require 40 ACH for emergency mode. Check your local fire marshal’s requirements before finalizing your mechanical drawings.
Negative pressure zoning: Your C1D1 room must maintain negative pressure relative to all adjacent spaces at all times. This means air flows INTO the C1D1 room, not out of it. If a solvent release occurs, the vapor stays contained rather than migrating into corridors, offices, or other occupied spaces. Typical design spec: -0.02 to -0.05 inches water column relative to adjacent zones.
Makeup air: You cannot exhaust 30 ACH without replacing it. Your supply air system needs to match or exceed exhaust capacity. This is where costs escalate: the makeup air unit must include heating, cooling, and filtration to maintain lab temperature within operating parameters while dumping and replacing the entire room volume every two minutes during an emergency purge.
Budget reality: a properly engineered HVAC system for a 750 sq ft C1D1 extraction room runs ,000 to ,000 installed. The unit itself is ,000 to ,000. Ductwork, controls, interlocks, and commissioning are the rest. Operators who budget ,000 for HVAC end up with residential-grade units that cannot meet code, fail the fire marshal inspection, and get ripped out.
Electrical Infrastructure: Why Explosion-Proof Costs What It Costs
Every electrical component inside a C1D1 space must be rated for the hazard class. This means:
- Explosion-proof light fixtures: to each vs. for standard LED panels. A typical 750 sq ft lab needs 6 to 8 fixtures.
- Explosion-proof receptacles and switches: to each. Every outlet, every switch, every junction box.
- Intrinsically safe wiring methods: Rigid metal conduit or mineral-insulated cable throughout the C1D1 zone. Flexible conduit (Greenfield/MC cable) is not permitted in Division 1 areas.
- Explosion-proof disconnect switches: Your extraction equipment needs local disconnects rated for the hazard class. to ,200 each.
- Sealed conduit penetrations: Every conduit that enters or exits the C1D1 boundary must be sealed with listed compound within 18 inches of the boundary to prevent vapor migration through the conduit system.
Total electrical cost for a C1D1 extraction room: ,000 to ,000 above standard industrial wiring. The bigger the room, the wider the gap. This is non-negotiable. The fire marshal will not issue your occupancy permit until every fitting is verified.
Gas Detection and Emergency Interlocks
Your LEL (lower explosive limit) detection system is the brain of your safety infrastructure. It monitors flammable gas concentration in real time and triggers automatic responses at preset thresholds. Standard configuration:
- 10% LEL alarm: Audible and visual alarm activates. Operators are alerted. Normal ventilation increases to high-speed exhaust. This is your early warning.
- 25% LEL shutdown: Emergency exhaust activates at 30+ ACH. All non-essential electrical equipment de-energizes automatically. Extraction process halts. Gas solenoid valves close to isolate solvent supply.
- Sensor placement: Butane and propane are heavier than air. Sensors mount 12 inches above floor level. Ethanol vapor is slightly heavier than air. Mount at 18 to 24 inches. Place sensors near potential leak points: extraction vessel fittings, recovery tank connections, solvent transfer lines.
Budget: ,000 to ,000 for a 2 to 4 sensor system with controller, interlocks, and alarm panel. Add ,000 to ,000 annually for calibration and sensor replacement. Sensors drift over time. Quarterly calibration is standard; some jurisdictions require monthly. Never skip calibration. A sensor that reads 5% when the actual concentration is 15% is worse than no sensor at all.
Fire Suppression: Why Water Will Destroy Your Lab
Standard wet-pipe sprinkler systems have no place in a C1D1 extraction room. Water hitting pressurized solvent tanks creates thermal shock and potential vessel rupture. Water also destroys extraction equipment, crude oil inventory, and electronic controls.
The correct systems for hydrocarbon extraction labs:
- Clean agent suppression (FM-200, Novec 1230, or equivalent): Gaseous agents that extinguish fire without residue, water damage, or thermal shock. These systems discharge within 10 seconds and require room integrity testing to verify the space can hold the agent concentration long enough to suppress the fire. Cost: ,000 to ,000 installed for a 750 sq ft room.
- CO2 total-flood systems: Effective and less expensive than clean agents, but lethal to occupants at suppression concentrations. Requires pre-discharge alarm, time delay for evacuation, and lockout/tagout procedures. Only viable if the room can be evacuated before discharge.
- Dry chemical backup: Portable ABC extinguishers rated for Class B (flammable liquid) fires at every exit. These are your manual backup, not your primary system.
Your fire suppression system must be integrated with your gas detection and HVAC systems. A fire event triggers suppression discharge AND emergency exhaust shutdown (you need the clean agent to remain in the room, not get exhausted out). This interlock coordination requires a fire protection engineer who understands the sequencing.
AHJ Navigation: The Approval Process Nobody Warns You About
AHJ stands for Authority Having Jurisdiction. For a cannabis extraction lab, you are typically dealing with four to seven separate AHJs, and they do not always agree with each other:
- Local fire marshal: Reviews your C1D1 classification, HVAC design, fire suppression, gas detection, and electrical plans. This is usually the hardest approval to get.
- Building department: Reviews structural, mechanical, and electrical plans for code compliance.
- State cannabis regulatory agency: Reviews your facility against state-specific cannabis manufacturing requirements.
- Electrical inspector: Verifies all C1D1-rated components are properly installed and listed for the hazard class.
- OSHA (or state equivalent): Workplace safety standards, hazardous materials handling, employee training documentation.
- Zoning board: Confirms your location is zoned for cannabis manufacturing and meets setback requirements.
Start your AHJ research before you sign a lease. The most expensive mistake in lab design is building out a space that one AHJ approves and another rejects. A PE (Professional Engineer) licensed in your state who specializes in hazardous location design can navigate this process and produce stamped drawings that satisfy all parties. Budget ,000 to ,000 for engineering and PE review, depending on complexity. That investment prevents ,000 in rework when the fire marshal rejects your build.
C1D1 Compliance Cost Summary
| System | Budget Range | Notes |
|---|---|---|
| HVAC (C1D1 rated, with interlocks) | ,000 to ,000 | Includes makeup air unit, ductwork, controls |
| Electrical (explosion-proof) | ,000 to ,000 | Above standard industrial wiring cost |
| Gas detection and interlocks | ,000 to ,000 | Plus K to K/year calibration |
| Fire suppression (clean agent) | ,000 to ,000 | FM-200 or Novec 1230 |
| PE engineering and AHJ review | ,000 to ,000 | Stamped drawings, fire marshal liaison |
| Total compliance infrastructure | ,000 to ,000 | Before extraction equipment |
That number shocks most operators. They budget ,000 for the entire lab and discover that compliance infrastructure alone exceeds their total budget. This is the number one reason extraction labs stall in the permitting phase: the operator did not know what C1D1 compliance actually costs until the fire marshal told them.
The alternative is worse. Operating without proper C1D1 classification means operating illegally. One fire marshal visit, one insurance claim, one employee injury, and you are shut down permanently with personal liability exposure that no LLC structure will protect you from.
Building Your Sales Channel
This might sound counterintuitive, but you should be building your sales pipeline at the same time you are building your lab, not after you start producing. Operators who wait until they have product to start selling end up with inventory they cannot move and no cash flow to sustain operations.
Key sales principles:
- Build relationships in the industry early. Attend conferences, connect with other operators, and be transparent about your capabilities.
- Have your product pre-sold before your first production run whenever possible.
- Build integrity. Keep your word on deadlines, quality specifications, and commitments. Repeat business comes from trust.
Sourcing Biomass: 7 Things to Check
Your extract is only as good as your starting material. Before purchasing biomass, verify these seven factors:
- Homogenized testing: Ask if COA results came from homogenized samples (mixed material). Homogenized tests can mask inconsistencies in cannabinoid content.
- Vendor reputation: Do not buy purely on price. Cheap biomass with poor cannabinoid content or contamination will cost you more in failed production.
- Moisture control: Biomass stored in humid conditions develops powdery mildew and mold. Ensure proper storage conditions.
- Bottom-of-bag inspection: Do not just check the top of a bag. Material quality can vary dramatically from top to bottom.
- Trichome inspection: Use a jeweler’s loupe to assess crystal/trichome density. Cannabinoids are in the trichomes; poor crystal content means poor yields.
- No cannabinoids in fan leaves: Dark green leaf material without visible trichomes contains only chlorophyll, which will contaminate your extract.
- Contract negotiation: Structure contracts so the farmer has a stake in your processing success. This incentivizes them to deliver quality material.
Frequently Asked Questions
How much does it cost to build a cannabis extraction lab?
A functional extraction lab producing dabbables and vape products can be built for as little as $50,000 to $75,000 using an LPG closed loop system, vacuum ovens, and basic winterization equipment. Scaling up with wiped film distillation and automated filling equipment can push total investment to $200,000 to $500,000. CO2 extraction systems alone start at $750,000 for comparable throughput, which is why most operators choose hydrocarbon systems.
How much space do you need for a cannabis extraction lab?
A minimum of 750 square feet is recommended for the extraction and post-processing areas alone. This does not include space for biomass storage, packaging, or any other operations. Vertically integrated facilities with additional functions will need significantly more space, but 750 square feet is a practical starting point for a dedicated extraction and post-processing operation.
Is CO2 extraction better than hydrocarbon extraction?
For most operators producing dabbable and vapable products, hydrocarbon (LPG) extraction is the better choice. CO2 systems are significantly slower, cost 25 to 50 times more for equivalent throughput, and extract more fats and lipids that require extensive post-processing to remove. CO2 may have niche advantages for certain product types, but LPG closed loop systems deliver superior versatility, speed, and cost-effectiveness when properly operated with safety training.
Can you skip winterization if your solvent is cold enough?
No. This is one of the most common misconceptions in the industry. While colder solvents pick up fewer fats and lipids, going below -30°C dramatically reduces cannabinoid yield due to decreased solvent saturation. At -60°C you might avoid winterization but your yields drop to 6% to 8%, which is economically unviable. The optimal approach is running at -30°C and performing proper winterization before distillation to achieve 90%+ total active cannabinoids on first pass.
Why should you decarboxylate before distillation instead of during?
Dedicated decarboxylation at 140°C for 45 minutes before distillation removes residual solvents and converts cannabinoid acids to their active forms. Skipping this step forces your distillation system to handle decarboxylation mid-process, resulting in run times stretching from 2 to 3 hours to 10 to 14 hours, oversized heads fractions, and contaminated main body collections. Proper decarb is the single biggest factor in achieving 90%+ purity on first-pass distillation.
What safety certifications does a cannabis extraction lab need?
At minimum, your lab needs Class 1 Division 1 electrical ratings for all components in areas where flammable vapors may be present. You also need a gas-based fire suppression system, LEL (lower explosive limit) gas detection integrated with emergency ventilation capable of 30 air changes per hour, static discharge mats at all entry points, and proper PPE including three types of gloves, lab coats, and eye protection. Operating to cGMP standards is strongly recommended to future-proof against federal regulation.
Can distillation separate CBD from THC?
No. CBD and Delta-9 THC have boiling points so close together that they always co-distill, especially under vacuum where all boiling points decrease further. No amount of cold traps, additional condensers, or specialized equipment can achieve this separation via distillation. Any equipment manufacturer claiming otherwise is either misinformed or misleading you. Chromatographic methods are required for CBD/THC separation.
What is the best terpene ratio for vape cartridges?
We recommend a maximum of 5% total terpene content by weight of oil. Exceeding this ratio causes harshness, coughing, and throat burn that consumers will immediately notice. Always use naturally derived terpenes rather than synthetic alternatives. Synthetic terpenes are the number one cause of consumer complaints about harsh vapor quality. Most flavor profiles can be created from combinations of seven primary terpenes in varying ratios.
What is C1D1 classification and does my extraction lab need it?
Class 1 Division 1 (C1D1) is an electrical area classification under NFPA 70 that applies to any space where ignitable concentrations of flammable gases or vapors exist under normal operating conditions. If you run butane, propane, or ethanol extraction, your extraction room is C1D1. This classification dictates that every electrical component in the room, from light fixtures to outlets to thermostats, must be explosion-proof or intrinsically safe. There is no way around it. The fire marshal will not issue your occupancy permit without it, and your insurance will not cover you without it.
How much does C1D1 compliance cost for a cannabis extraction lab?
For a 750 sq ft extraction room, C1D1 compliance infrastructure (HVAC with interlocks, explosion-proof electrical, gas detection, clean agent fire suppression, and PE engineering review) typically runs ,000 to ,000. This is before any extraction equipment. The HVAC system alone is ,000 to ,000 because it must deliver 12+ air changes per hour normally and 30+ ACH in emergency mode, with negative pressure zoning and heated/cooled makeup air. Most operators underestimate this number by 50% or more, which is the leading cause of lab buildout projects stalling in the permitting phase.
Ready to level up your extraction game? Contact WKU Consulting for personalized guidance on building your extraction lab.
For more deep dives into cannabis chemistry, extraction SOPs, and lab design, subscribe to the WKU Consulting YouTube channel. New videos every week covering everything from distillation theory to advanced cannabinoid conversions.
Watch the full video walkthrough: