What Is Ethanol Shatter?
Ethanol shatter is a cannabis concentrate produced by dissolving cannabinoids and terpenes in cold ethanol (-20C to -80C), filtering, evaporating the solvent, and vacuum purging the residual into a stable, glass-like sheet. The key variable is temperature: colder ethanol washes extract fewer waxes and chlorophyll, producing a cleaner crude that purges to a translucent, amber shatter. Warm ethanol washes co-extract lipids and pigments that prevent the final product from reaching shatter consistency. Typical purity: 65-80% total cannabinoids. Ethanol shatter costs roughly $0.42 per gram of crude processed at a 10:1 solvent ratio, making it one of the most cost-effective concentrate formats for small-scale operators.
What Is Ethanol Shatter?
Ethanol shatter is a translucent, glass-like cannabis concentrate produced through cold ethanol extraction followed by winterization, solvent recovery, and vacuum purging. Unlike BHO (butane honey oil) shatter, ethanol shatter uses food-grade ethanol as the primary solvent — making it a popular choice for processors who want a safer, more accessible extraction workflow without sacrificing quality.
In this guide, we break down the complete 7-step SOP for producing ethanol shatter, based on the bench-top methodology taught by WKU Consulting. Whether you’re running a small bench-top setup or scaling to an industrial operation, this process can be adapted to match your throughput.
Equipment You’ll Need
- Griffin (graduated) beaker
- 5-gallon bucket
- Dry ice
- Food-grade ethanol
- Isopropyl alcohol (for cryogenic bath)
- 20-micron filtration/mesh bag
- Laser temperature gun
- Buchner funnel with vacuum hookup
- Filter papers (10, 5, and 2.5 micron)
- Activated charcoal
- Rotary evaporator (rotovap) with auxiliary chiller
- Vacuum oven with vacuum pump
- Parchment paper and oven trays
If you’re unfamiliar with how solvent selection affects your final product, check out our guide on BHO vs. ethanol extraction and solvent polarity.
For a deep dive into vacuum oven parameters, terpene preservation during purging, and product-specific devolatilization settings, see our complete cannabis devolatilization guide.
Step 1: Prepare the Cryogenic Ethanol Bath
Place your Griffin beaker inside a 5-gallon bucket. Pack dry ice around the beaker (not inside it). Pour your ethanol into the beaker, then add one cap of isopropyl alcohol around the dry ice. The isopropyl creates a chemical reaction that drops the dry ice temperature even further below its natural sublimation point — giving you the ultra-cold ethanol bath needed for a clean extraction.
Quick recap: Beaker in the bucket → ethanol in the beaker → dry ice around the beaker → cap of isopropyl around the dry ice.
Step 2: Soak the Biomass
Load your cannabis or hemp biomass into a 20-micron filtration bag. Using a laser temperature gun, verify that the ethanol has reached -20°C or colder. If it hasn’t, wait longer or add another cap of isopropyl alcohol to the dry ice.
Once at temperature, submerge the filtration bag in the ethanol and agitate for 60 seconds. Dunk, stir, and mix — think of it like dipping a cookie in milk. The filtration bag eliminates the need to filter plant material later, keeping your workflow clean.
Cold contact time is critical. Keeping the soak short (60 seconds) at sub-zero temperatures ensures you’re pulling cannabinoids and terpenes while leaving behind unwanted fats, waxes, and chlorophyll.
Step 3: Squeeze and Recover
Remove the filtration bag and squeeze out as much ethanol as possible. For larger operations, use a centrifuge. Every drop you recover contains valuable cannabinoids, so don’t leave product behind in the biomass.
Step 4: Winterization — The Multi-Stage Freeze-Filter Process
Lab safety is essential during this phase. Winterization removes residual fats, lipids, and waxes through repeated freeze-filter cycles:
- First freeze: Place the beaker in a freezer at -30°C for 12 hours, then filter through a 10-micron Buchner funnel setup.
- Second freeze: Return to the freezer for another 12 hours at -30°C, then filter at 5 microns.
- Third freeze: Freeze for a final 12 hours (36 hours total) at -30°C. This time, filter at 2.5 microns with a bed of activated charcoal (wetted with ethanol) on top of the filter paper for color remediation.
This progressive winterization strategy produces an exceptionally clean crude that’s ready for solvent recovery.
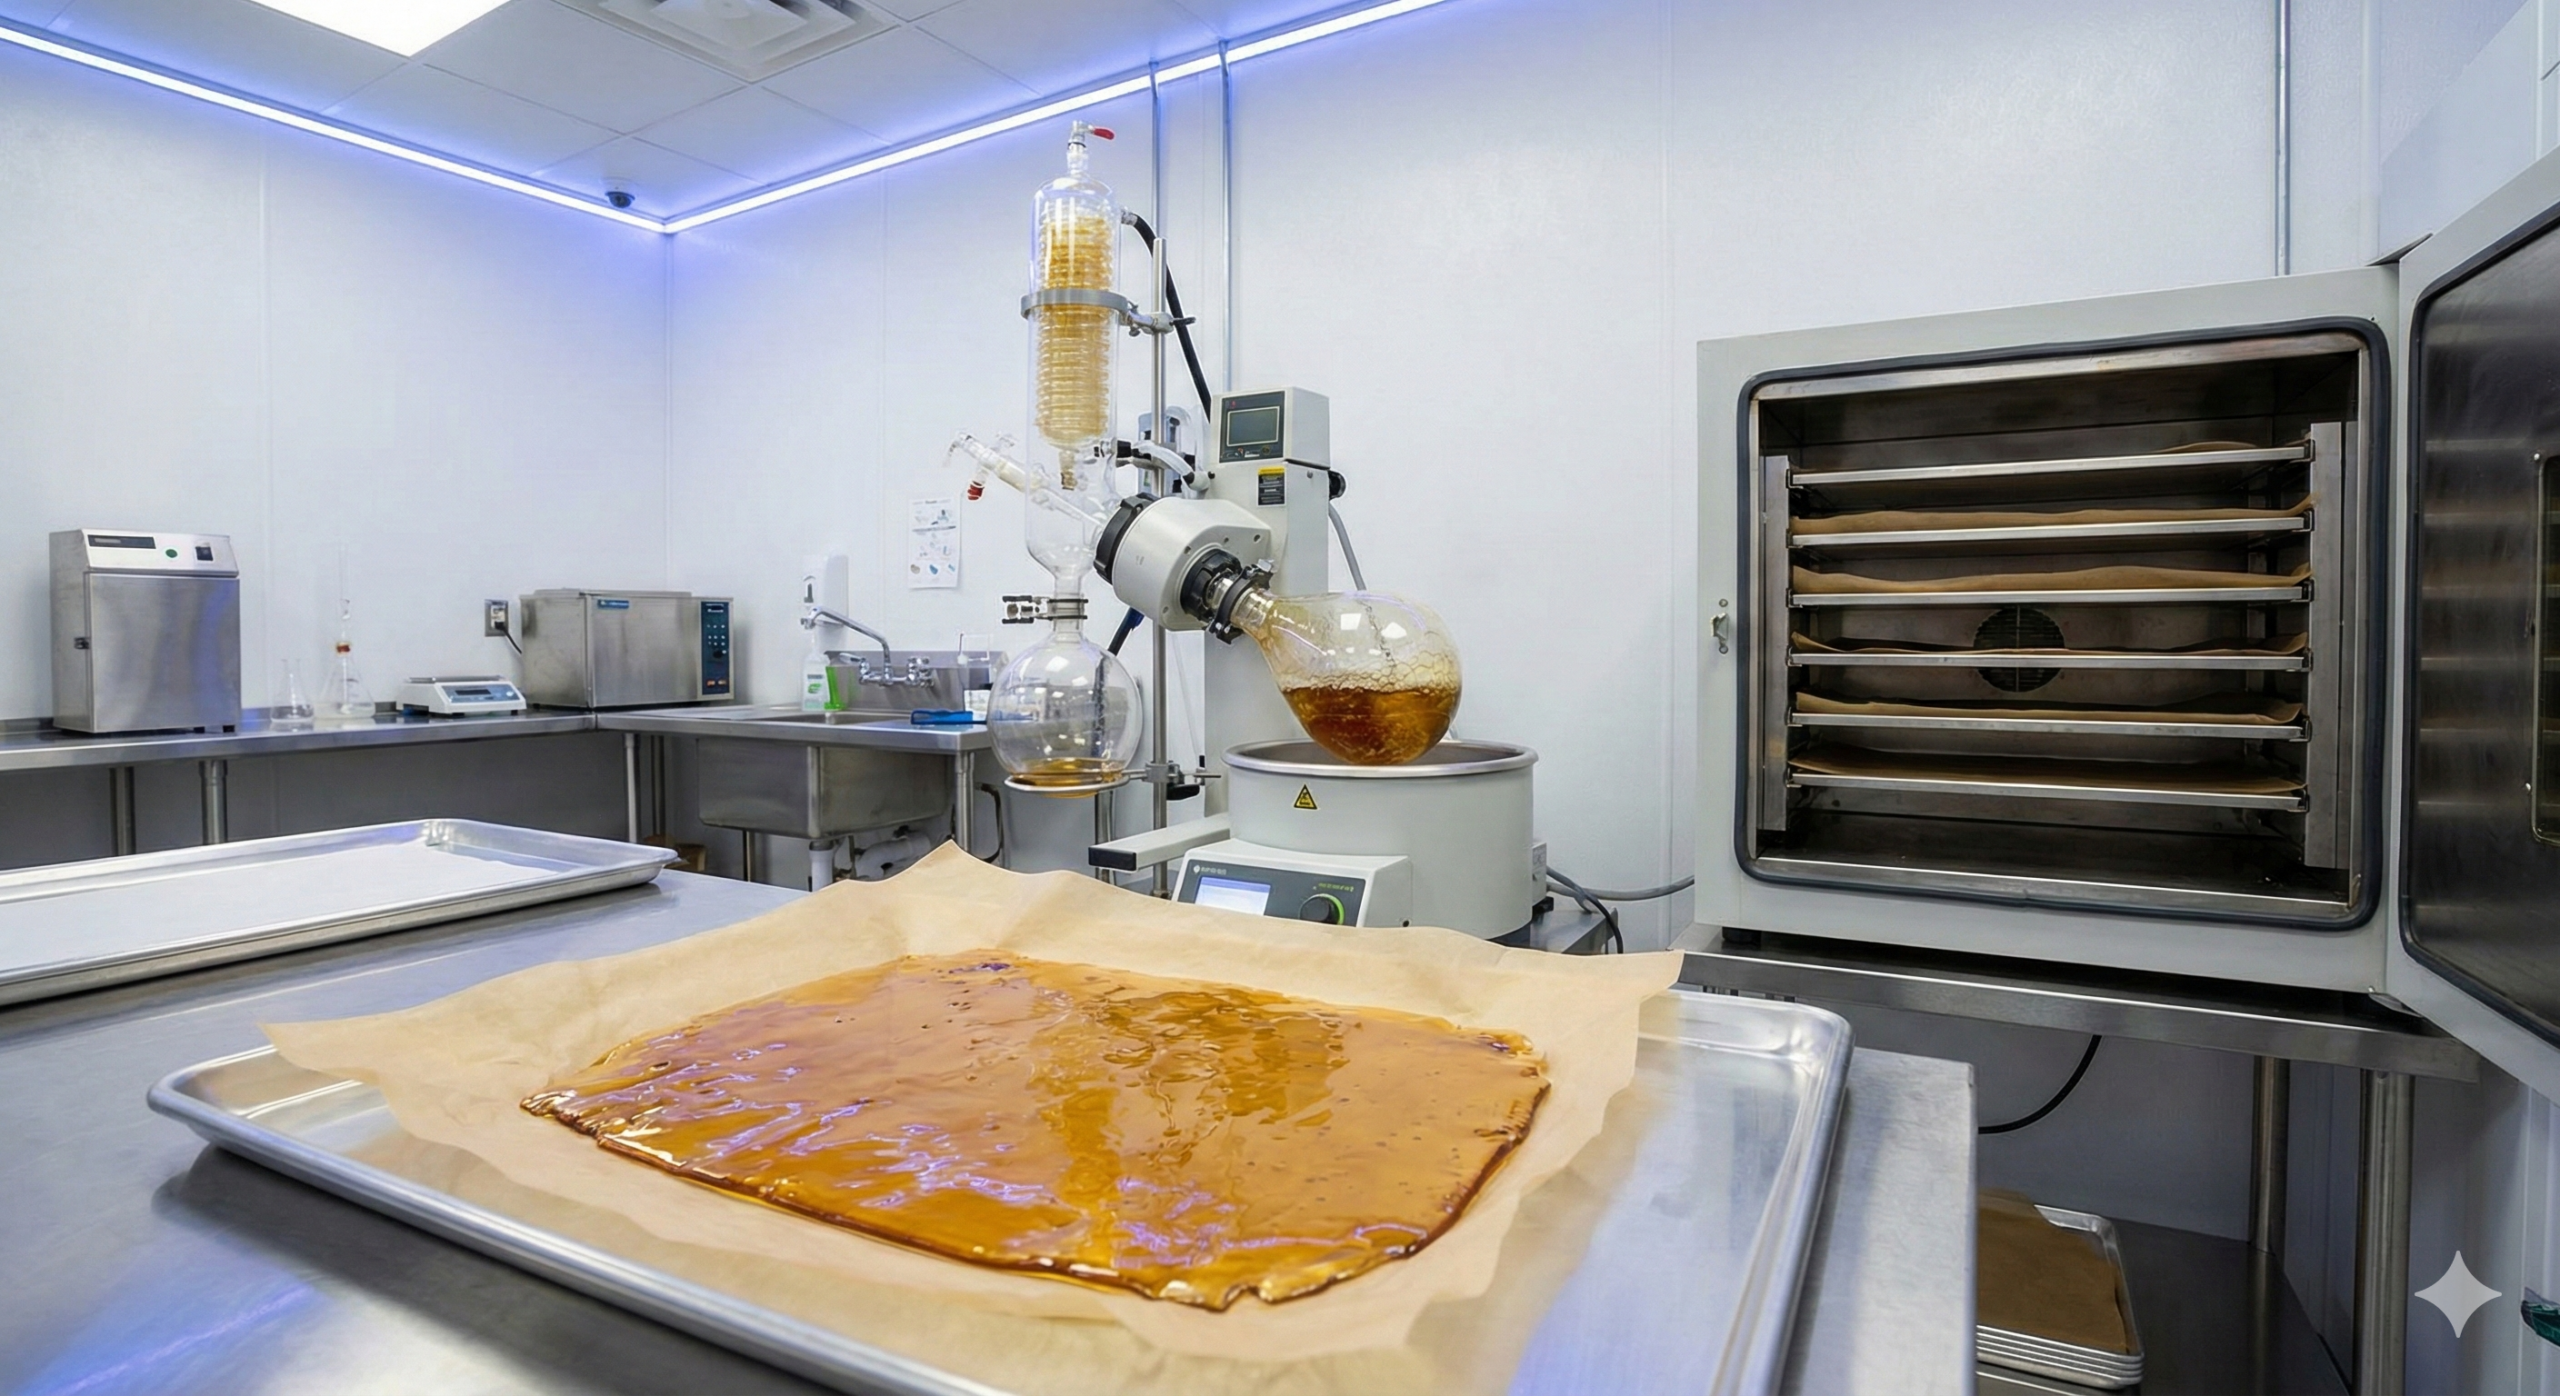
Step 5: Rotovap — Solvent Recovery
Feed the winterized crude into your rotary evaporator and recover the ethanol under vacuum at 30°C. The auxiliary chiller keeps the condensing coils cold enough to recondense ethanol vapor back to liquid for reuse.
Watch for two signs that recovery is nearly complete: the oil starts climbing the walls of the rotating flask, and the drip rate on the condensing coils slows significantly.
While the rotovap is finishing, preheat your vacuum oven to 86°F (30°C) so it’s at temperature before the slab goes in.
If you want to understand how distillation theory applies to solvent recovery and further refinement, we cover that in depth.
Step 6: Pour Onto Parchment and Load the Vacuum Oven
Pour the concentrated oil from the rotovap flask onto a parchment paper boat placed on an oven tray. Learning to fold a proper parchment boat is a key post-production skill — it keeps the slab contained and makes flipping easier.
Slide the tray into the preheated vacuum oven at 86°F and pull the deepest vacuum possible. Be careful on the initial pull — the slab may bubble aggressively, and you don’t want it boiling over the tray.
Step 7: Vacuum Purge Schedule
The purge schedule is where shatter gets its signature glassy texture:
- Day 1: Hold at 86°F under full vacuum for 24 hours. Flip the slab every 12 hours (2 flips total).
- Days 2–4: Raise temperature to 115°F. Continue flipping every 12 hours for 3 additional days (approximately 5 more flips, 7 total across the entire purge).
The low initial temperature prevents the slab from nucleating into a buddery or waxy consistency. Gradually increasing to 115°F drives out residual solvent while preserving the shatter-like structure.
Vacuum Purge Parameter Table
| Target Texture | Initial Temp | Final Temp | Vacuum (inHg) | Hold Time | Flip Interval | Failure Mode |
|---|---|---|---|---|---|---|
| Glass-clear shatter | 90F | 105F | -29.5 | 24-48h | Every 6-8h | Over 110F causes terpene loss and sugar nucleation |
| Pull-and-snap | 100F | 115F | -29.0 | 18-36h | Every 4-6h | Under-purging leaves residual ethanol above 500 ppm |
| Crumble/budder | 110F | 130F | -28.5 | 12-24h | Every 2-4h (whip) | Aggressive whipping introduces moisture if humidity > 40% |
The key variable most operators miss: thin film thickness on the parchment. Anything thicker than 2-3mm creates a vapor barrier where the outer surface purges but the interior traps solvent. Pour thinner, purge faster, pass testing first attempt.
Bench-Top vs. Industrial Scale
Everything in this SOP works at bench-top scale, but every piece of equipment has an industrial equivalent. The 5-gallon bucket becomes a jacketed vessel, the manual squeeze becomes a centrifuge, the benchtop rotovap becomes a 20L or 50L unit, and the small vacuum oven becomes a multi-shelf industrial purging system. The process stays the same — only the throughput changes.
| Metric | Bench-Top (1-5 lb/day) | Small Commercial (10-20 lb/day) | Industrial (50+ lb/day) |
|---|---|---|---|
| Equipment cost | $2K-8K | $15K-40K | $80K-200K+ |
| Ethanol per lb biomass | 1 gallon | 0.8 gallon (recovery) | 0.5 gallon (closed loop) |
| Cost per gram of shatter | $8-15/g | $3-6/g | $1-3/g |
| Solvent recovery rate | 60-75% (manual) | 85-92% (rotovap) | 95-98% (falling film) |
| Bottleneck | Vacuum purge time | Winterization throughput | Biomass prep and loading |
The economics shift dramatically at the 10 lb/day threshold. Below that, your time is your biggest cost. Above it, solvent recovery rate determines your margin. The operators who fail at scale are the ones who skip the falling film evaporator and try to rotovap 50 pounds of tincture.
Troubleshooting: Why Your Ethanol Shatter Is Not Glass-Clear
Every failed batch of ethanol shatter traces back to one of four variables: temperature, contact time, filtration, or purge. Here is how to diagnose and fix the most common failures.
Cloudy or Hazy Product
Cloudiness means fats and waxes made it through your winterization. Either your freezer temperature was not cold enough (needs to be -20C or colder for 24 hours minimum), your contact time during extraction was too long, or your filter paper was too coarse. Drop to 1-micron paper and extend your freeze time to 48 hours. If you are still getting haze, your ethanol was not cold enough during the initial soak. Every degree above -20C lets more lipids dissolve.
Dark Green or Brown Product
Dark color means chlorophyll contamination. The two causes: warm extraction temperature and grinding the biomass too fine. Chlorophyll dissolves readily in ethanol above 0C. If your extraction ethanol is warmer than -15C, you will pull pigments no matter how short your soak is. Never grind your flower before extraction. Break buds by hand into pea-sized pieces at most. Every ruptured cell wall releases chlorophyll, lipids, and plant waxes directly into solution.
Sticky or Taffy-Like Texture (Not Snapping)
If your shatter bends instead of snapping, you have residual solvent. Your vacuum purge was either too short, too cold, or your vacuum depth was insufficient. Ethanol boils at 78.37C at atmospheric pressure, but under vacuum at -29 inHg, it boils at approximately 15-20C. Run your vacuum oven at 100-110F (38-43C) with full vacuum for a minimum of 24 hours. Flip the slab every 8 hours. If you are running thicker pours (over 3mm), extend to 48 hours. Residual ethanol above 500 ppm will prevent snap.
Sugaring or Nucleation
When your shatter turns from glass to a crystalline, sugary texture over days or weeks, that is THCA nucleation. It is not a defect in your process per se. It happens because high-purity THCA is thermodynamically more stable as a crystal than as an amorphous glass. Factors that accelerate nucleation: temperature fluctuations during storage, high THCA concentration (above 70%), residual terpenes acting as solvents, and mechanical agitation. Store finished shatter at room temperature in a dark, stable environment. If you are consistently getting sugar instead of glass, you may need to reduce terpene content during purge or accept that your starting material has too much THCA for stable glass formation.
Ethanol Extraction Temperature and Compound Selectivity
Temperature controls everything about what ends up in your extract. Ethanol is a polar solvent. At room temperature, it dissolves cannabinoids, terpenes, chlorophyll, plant waxes, and water-soluble compounds indiscriminately. Drop the temperature to -40C and ethanol becomes selective: cannabinoids and terpenes dissolve, but chlorophyll stays locked in the plant matrix and waxes precipitate on contact.
The mechanism is straightforward. Chlorophyll is bound to membrane proteins by weak hydrophobic interactions. At -40C, ethanol does not have enough kinetic energy to disrupt those bonds. Waxes (C24-C34 alkyl esters) have melting points between -5C and 15C. Below their solidification threshold, they crash out of solution as the ethanol flows through the biomass. You never extract them in the first place, which means you never need to winterize them out later.
| Ethanol Temp | What Dissolves | What Stays Behind | Post-Processing Needed | Best For |
|---|---|---|---|---|
| Room temp (20C) | Everything: cannabinoids, terpenes, chlorophyll, waxes, sugars | Cellulose only | Full winterization + carbon scrub + CRC | RSO, crude for distillation |
| -20C | Cannabinoids, terpenes, some waxes, minimal chlorophyll | Most chlorophyll, heavy waxes | Light winterization + optional CRC | Crude for distillation (faster post-processing) |
| -40C | Cannabinoids, terpenes, trace waxes | Chlorophyll, waxes, plant pigments | Quick winterization polish or direct purge | Shatter, pull-and-snap |
| -60C to -80C | Cannabinoids, limited terpenes | Nearly all non-cannabinoid compounds | Minimal. Direct purge possible. | Ultra-pure shatter, distillation feedstock |
This is why the -40C wash is the sweet spot for shatter production. Cold enough to leave chlorophyll and waxes behind, warm enough to capture a full terpene profile. Go colder than -60C and you start losing monoterpenes to reduced solubility, which means your shatter looks flawless but tastes flat.
Dewaxing vs. Winterization: Which Process Do You Actually Need?
These terms get used interchangeably, but they are different processes targeting different contaminants at different stages.
| Parameter | Dewaxing (Inline) | Winterization (Post-Extraction) |
|---|---|---|
| When it happens | During extraction | After extraction, before solvent recovery |
| Temperature | -40C to -80C | -20C to -40C |
| What it removes | Plant waxes, lipids | Fats, waxes, lipids that survived extraction |
| Equipment | Jacketed columns, dry ice bath | Freezer, Buchner funnel, filter papers |
| Best for | BHO (inline with extraction) | Ethanol extraction (separate step) |
| Effectiveness | Removes 80-90% of waxes | Removes 95%+ of waxes with proper protocol |
For ethanol shatter specifically, winterization is the standard approach. Your extraction already happened at cold temperatures, but ethanol is a more polar solvent than butane, so it dissolves more fats and waxes even when cold. The winterization step catches what the cold extraction missed. For a complete breakdown of the winterization process, see our winterization and dewaxing guide.
Yield Expectations by Starting Material
Your yield depends on cannabinoid content of the starting material, extraction efficiency, and losses during post-processing. Here are realistic expectations for ethanol shatter:
| Starting Material | Cannabinoid Content | Expected Shatter Yield | Notes |
|---|---|---|---|
| Premium flower (20%+ THC) | 20-30% cannabinoids | 12-18% by weight | Best quality, least post-processing needed |
| Mid-grade flower (12-18% THC) | 12-18% cannabinoids | 8-14% by weight | More plant material means more chlorophyll risk |
| Trim and sugar leaf | 5-10% cannabinoids | 4-8% by weight | Higher wax content, needs aggressive winterization |
| Kief or dry sift | 40-60% cannabinoids | 30-45% by weight | Highest yield, minimal winterization needed |
These yields account for losses during winterization (5-10% of cannabinoids lost with removed waxes), solvent recovery (2-5% product left in rotovap flask), and vacuum purging (1-3% volatiles removed). If your yields are significantly below these ranges, check your extraction temperature and contact time first.
The full ethanol extraction workflow, including post-processing and purging SOPs, is one of the core modules in our training program at extractiontraining.com.
Common Mistakes That Ruin Ethanol Shatter
- Grinding the biomass. Every cell wall you rupture releases chlorophyll. Break by hand only.
- Extracting with warm ethanol. If your ethanol is above -15C, you are making RSO, not shatter. The selectivity comes from temperature.
- Skipping winterization. Even cold ethanol pulls some waxes. Without winterization, your shatter will be cloudy and waxy.
- Filtering with coarse paper only. Start at 10 micron, step down to 5, then 2.5. Skipping steps means lipids pass through.
- Rushing the vacuum purge. 12 hours is not enough for ethanol shatter. The ethanol molecule is larger than butane and takes longer to migrate out of the matrix. Minimum 24 hours at full vacuum.
- Purging too hot. Above 115F, you start decarboxylating THCA to THC. That changes the physical properties of the concentrate and can prevent glass formation. Keep purge temps at 100-110F.
- Thick pours. Pour your product thin (2-3mm max) on parchment. Thick slabs trap solvent in the center where vacuum cannot reach efficiently.
Ethanol Shatter vs. BHO Shatter: Key Differences
Ethanol and butane both produce shatter, but the chemistry creates different challenges. Butane is nonpolar, so it selectively extracts cannabinoids and terpenes while leaving most polar compounds behind. Ethanol is polar, which means it also pulls chlorophyll, plant waxes, and sugars. That is why ethanol shatter requires more aggressive post-processing (winterization, activated charcoal) to achieve the same clarity as BHO shatter.
The tradeoff: ethanol is safer to handle (no explosion risk), more accessible (no hydrocarbon license required in most states), and the equipment costs less. BHO produces cleaner crude that needs less post-processing, but closed-loop systems cost $15,000-$50,000+ and require proper ventilation, gas detection, and C1D1 classification. For a detailed comparison of these two extraction methods, see our BHO vs. ethanol extraction guide. For lab layout, C1D1 ventilation design, and facility cost breakdowns by method, see our extraction lab design guide.
For solvent-specific purge protocols with exact temperature ramps, vacuum staging, and state compliance limits, see our residual solvent purging SOP.
Frequently Asked Questions
Can you make shatter with 190-proof Everclear?
Yes. 190-proof (95%) Everclear is the standard solvent for ethanol shatter. The remaining 5% water does not significantly affect extraction quality at cryogenic temperatures because the water freezes. Do not use 151-proof or lower. The higher water content dissolves more polar compounds and makes winterization harder.
Why does my ethanol shatter taste harsh?
Harsh taste comes from chlorophyll, plant waxes, or residual activated charcoal. Check your extraction temperature (was it cold enough?), your winterization protocol (did you filter to 2.5 micron?), and whether you rinsed your charcoal before use. Unwashed activated charcoal releases fine particulates that pass through filters and create a bitter, ashy taste.
How long should I vacuum purge ethanol shatter?
Minimum 24 hours at 100-110F under full vacuum (-29 inHg). Flip the slab every 8 hours. For thick pours (over 3mm), extend to 48 hours. Test residual solvent levels before packaging. Most states require below 500 ppm residual ethanol for legal concentrates.
Can I use isopropyl alcohol instead of ethanol?
Technically yes, but isopropyl alcohol (IPA) is not food-grade and is classified as toxic for human consumption. The residual solvent limits for IPA in concentrates are much stricter (5,000 ppm for ethanol vs 500 ppm for IPA in most states). Use food-grade ethanol for any product intended for consumption.
Why did my shatter turn to sugar after a week?
THCA nucleation. High-purity THCA is thermodynamically unstable as an amorphous glass. Over time, it rearranges into a crystalline structure. Temperature fluctuations, high THCA content (above 70%), and residual terpenes all accelerate this. It is not a quality defect. It is chemistry. Store at stable room temperature in the dark.
What is the minimum equipment needed for ethanol shatter at home?
A graduated beaker, dry ice, food-grade ethanol, a 20-micron filtration bag, a freezer that hits -20C, filter papers (10, 5, 2.5 micron), a Buchner funnel with vacuum source, and a vacuum oven. Skip the rotovap at home scale and use a double boiler for initial solvent reduction instead. Total equipment cost for a bench-top setup: $500-$1,500 depending on vacuum oven quality.
How do I make my ethanol shatter more terpy?
Terpenes are volatile. Every heating step destroys them. To maximize terpene retention: keep extraction temperatures as cold as possible (terpenes are less soluble at low temps but enough survive), minimize rotovap temperature (keep bath below 40C), and purge in the vacuum oven at the lowest effective temperature (100F, not 110F). You will always lose more terpenes with ethanol extraction than with BHO because the post-processing steps are longer and involve more heat exposure.
For more on how CRC (color remediation chromatography) can improve the appearance and flavor of ethanol extracts, see our CRC chemistry guide.
Final Thoughts
Ethanol shatter is one of the most approachable concentrate formats for new processors. The equipment is relatively affordable, ethanol is widely available, and the process is forgiving compared to hydrocarbon extraction. The keys to success are cold temperatures during extraction, thorough winterization, and patient vacuum purging.
Ready to level up your extraction game? Contact WKU Consulting for personalized guidance on building your extraction lab — from bench-top to industrial scale.
For more deep dives into cannabis chemistry, extraction SOPs, and lab design — subscribe to the WKU Consulting YouTube channel. New videos every week covering everything from distillation theory to advanced cannabinoid conversions.
Watch the full video walkthrough: